Oracle Business Intelligence Enterprise Edition (OBIEE 12c) - RPD Development Environment with Git and GitGlow
note
OBIEE RPD Development Environment to work with Git and GitFlow. The sources mentioned in this guide are available here.
1. Introduction#
In different sites they talk about the advantage of working with Git in the development of projects with OBIEE. Some give some details about how they implement their development flow, but only one (Rittman Mead) ends up giving specific details on how to implement it. The following method is more simple that Rittman Mead uses and focuses on the development of the RPD. I hope that this will help those who work in the singular world of Oracle, and even more in Oracle Business Intelligence. The following method is the one I have used (and still use) in my years as an OBIEE developer.
2. Work tools#
OBIEE only has one development client for Windows platform. I hope that one day, as a Linux user, Oracle will come to deliver a version for Linux. Although some time ago, speaking with an Oracle representative, he commented that they were working on a version of RPD based on the Oracle database. We will see if one day it becomes a reality, and if it works.
These are the work tools:
- Admintool (OBIEE client)
- SourceTree (Atlassian)
Server tools:
- Private Git server (GitLab)
3. Configuring the work environment#
3.1 Setup your main git repository paths#
Choose a path for the Git repositories, for example "C:\Git-Repos" (avoid use a path with blank spaces, here we will clone all the projects), and choose another temporary path where the merges will be compiled between different versions:
3.2 Setup a git repo for all the OBIEE scripts#
On your private git server create a new repository where you save all the scripts. Any subsequent change can be easily updated in all work teams. This scripts are in the folder OBIEE_Scripts and contain the following scripts:
- Abort Merge
- Compare A>B
- Compare B>A
- Set Compare A
- Set Compare B
- Download RPD
- Merge
- Merge DEC
- Open RPD
- Patch
- Release Notes
- Release Notes (All)
- Release Notes (All details)
- Release Notes (Latest tag)
- Resolve Merge
- Resolve Merge (Auto)
- Upload RPD
3.3 Setup environment variables#
The above scripts need certain environment variables to work. In Windows 10 you can add them by following these steps:
- Open a window Explorer.
- Right click on "This PC" and select the "Properties" option.
- In the System window, select the "Advanced System Settings" option.
- In the System Properties window, Advanced Tab, click on the "Environment variables" button.
Then add the following variables:
| Variable | Value (this are examples) | Description |
|---|---|---|
| OBIEE_CLIENT_HOME | C:\Oracle\Middleware\OracleBI12c_122130 | Path of the Admintool client |
| OBIEE_GIT_REPOS | C:\Git-Repos | Path of the git repositories |
| OBIEE_SERVER | 192.168.56.103 | OBIEE Server IP (your sandbox) |

3.4 Setup custom actions for use with SourceTree#
The above scripts must be added as custom actions inside SourceTree. Follow these steps for each script and go to Tools > Options > Custom Actions. From there we will create the following actions:
3.4.1 Abort Merge#
3.4.2 Compare A > B#
3.4.3 Compare B > A#
3.4.4 Set Compare A#
3.4.5 Set Compare B#
3.4.6 Download RPD#
3.4.7 Open RPD#
3.4.8 Release Notes#
3.4.9 Release Notes (All)#
3.4.10 Release Notes (All details)#
3.4.11 Release Notes (Last TAG)#
3.4.12 Resolve Merge#
3.4.13 Resolve Merge (Auto)#
3.4.14 Upload RPD#
3.5 Basic folder structure of an OBIEE project#
The following folder structure is necessary in each OBIEE project in order for the scripts to work correctly:
The Scripts folder must contains the following files:
| File | Description | Content |
|---|---|---|
| AdminToolMerge.txt | Commands for the complete merge process | Same for all projects |
| AdminToolMergeDEC.txt | Commands for the initial merge process | Same for all projects |
| repository_filename.txt | RPD filename | Project specific |
| repository_name.txt | PROJECT_NAME | Project specific |
| xcopy.txt | Custom parameter for xcopy command | Same for all projects |
Note: for the files AdminToolMerge.txt and AdminToolMergeDEC.txt check the commands list you can use to administer a repository (Commands List). See the folder Scripts to get an example file for a project called "BankInsights".
4. RPD workflow with SourceTree and GitFlow#
Note: If you don't know the GitFlow workflow, read the following resource from Atlassian.
4.1 Initial setup of a new project "BankInsight"#
4.1.1 Create new repository from SourceTree#
- Destination path: C:\Users\btey\Documents\Git-Repos\BankInsight
- Name: BankInsight
- Type: Git
4.1.2 Setup Scripts folder#
- Copy the example folder
Scripts - Edit the file
Scripts\repository_filename.txtwith the text "BankInsight.rpd". - Edit the file
Scripts\repository_name.txtwith the text "BankInsight".
4.1.3 Create an empty RPD#
- Open Admintool
- File > New repository
- Select "Binary"
- Name: BankInsight.rpd
- Location: C:\Users\btey\Documents\Git-Repos\BankInsight\
- Import Metadata: No
- Repository Password: Admin123
- Retype Password: Admin123
- Save the RPD
- Close Admintool
4.1.4 Add RPD and specific project scripts to git#
- Go to SourceTree and select the new repository "BankInsight"
- Select "Stage All" to add all the files and folders to "Staged files"
- Set a comment, for example, "Init setup"
- Commit the changes
4.1.5 Enable GitFlow for this repository#
- The initial setup and previous commit has been created the default "master" branch.
- Go to the SourceTree toolbar, and clic the button "Git-flow".
- In the new window "Initialise repository for Git-flow", use the default options.
- Clic OK.
- The new "develop" branch is created.
4.1.6 Setup the scripts to resolve conflicts (by project or repository)#
- Go to SourceTree and select the new repository "BankInsight"
- Go to the toolbar and clic the button "Terminal"
- In the terminal put the following commands:
- Check the changes in the git config file:
4.1.7 Test a basic custom action from SourceTree#
- Select the first commit (double clic).
- Right mouse button, Custom Actions, Open RPD.
- SourceTree displays a window indicating that it is executing the custom action.
- Then Admintool opens with the RPD corresponding to the current commit in SourceTree.
- Close Admintool.
- The SourceTree window for the custom action executed closes.
4.2 Example workflow with GitFlow#
4.2.1 The first feature#
The idea is to use Git's own client, SourceTree, as much as possible. To start we will create a new feature by adding something simple, we will save it and close the new feature.
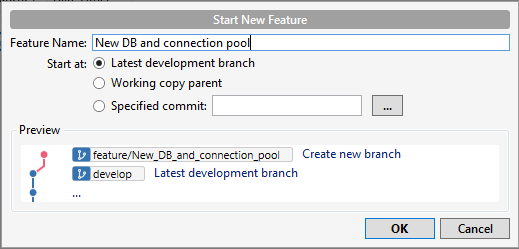
- From SourceTree, clic Git-flow and select the option "Start New Feature".
- Set the feature name, for example, "New DB and connection pool" and clic Ok.
- Select the latest commit and open the RPD with the custom action.
- From Admintool, create a new database and connection pool for general queries and other for initblocks.

- Save changes and close Admintool.
- From SourceTree, now appear an uncommit change.
- Select this uncommit line, stage the RPD, and clic "Commit" from the toolbar.
- Put a comment and clic commit.
- If you select now the created feature (from the sidebar) you will see the saved commit.
- Now finish the feature, clic Git-Flow and select "Finish Feature" and clic Ok.
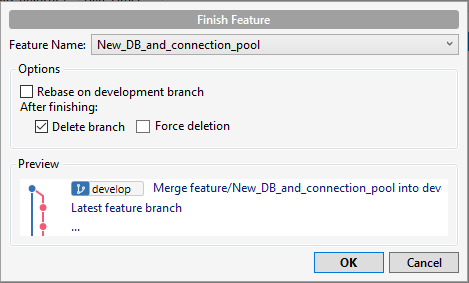
The first feature changes are now integrated into the "develop" branch.

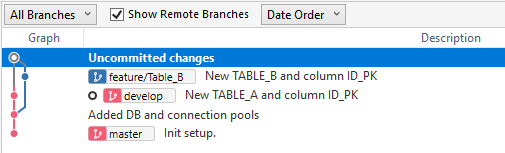
4.2.2 Two features in concurrent development#
This is the main reason why I use Git in OBIEE, not only for version control, but to work in parallel (concurrent development) with other developers in the same RPD. Let's see how it would work with several features at once:
- Create the first feature and name it as "Table A".
- Open the RPD from SourceTree with the custom action.
- Create TABLE_A with one column ID_PK.

- Create two logical tables (Dim and Fact) with this table as source and set a new join.
- Create the subject area and drag the new Dim and Fact.
- Save changes.
- Commit changes in SourceTree.
- Create the second feature (Git-flow > Other actions > Start New Feature) and name it as "Table B".
- Open the RPD from SourceTree with the custom action.
- Every new feature start from the develop branch. Therefore, the previous TABLE_A does not exist in this new feature.
- Create TABLE_B with one column ID_PK.

- Create two logical tables (Dim and Fact) with this table as source and set a new join.
- Create the subject area and drag the new Dim and Fact.
- Save changes.
- Commit changes in SourceTree.
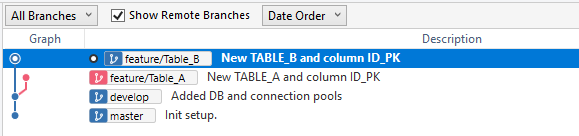
Now I have two different branches with their respective changes (Table A and Table B). In concurrent development we have two or more developers each working on a different change or feature. Once one of them ends and it is ok, the next step is to integrate it into the development branch without interfering with what the other developer is doing. In this case, the first to integrate their changes in the development branch may do so automatically.
- Select the branch "Table A" (double clic in the sidebar).
- Clic "Git-flow" in the toolbar.
- Select the option "Finish Feature" and verify that the "Feature Name" selected is "Table A".
- Press Ok button.
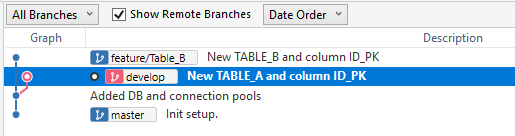
The branch "Table A" has been integrated (and deleted) into the branch "develop". Now I can open the RPD with the custom action, review the changes and confirm the presence of the new "Table A".

The next steep is integrate the branch "Table B" into the branch "develop". The process is the same, double clic into the branch "Table B" (from the sidebar), clic "Git-flow" (from the toolbar) and select the option "Finish Feature" and confirm with Ok. But the git merge process knows that before there has been a previous merge commit that should not be lost. If the RPD was a plain text file Git could see the difference and if it does not find conflicts do the merge automatically. But the RPD is a binary. In this case, Git will tell us that there is a conflict that must be resolved.
- Select the branch "Table B" (double clic in the sidebar)
- Clic "Git-flow" in the toolbar
- Select the option "Finish Feature" and verify that the "Feature Name" selected is "Table B"

- Press Ok button

SourceTree will return an alert message indicating that there is a conflict and should be resolved. If I check the list of commits, I'll see that I have pending changes related to the merge.
You can confirm the "merge" status with button "Terminal" in the toolbar. When the terminal window is open you will see (develop|MERGING). This indicates that we are in the "develop" branch in the process of merging, but first we must resolve the conflict before making a commit with the changes.
The conflict must be resolved with the Admintool using the three way merge. For Git this process is the most normal and will give us exactly the files that we need for the merge process with the Admintool. In previous steps (#6) we have configured Git so that in case of conflict use the tool that we indicated to solve it, instead of the own tools. To launch the process to resolve the conflict use the custom action "Resolve Merge" or use the terminal to execute the same command:
- Clic "Terminal" button in the toolbar
- In the terminal window put the command:
With this command we are telling Git to give us the necessary files to resolve the conflict and execute the script that we have indicated in the configuration. The output window or the terminal window show this:
Here Git tells us that it has detected a conflict between the "local" and the "remote" versions. The rest of the lines that appear in the terminal are the commands executed in the script that we have indicated in the configuration. If I check the project folder I will see that Git has returned 4 RPD files: BASE, LOCAL, REMOTE and BACKUP.

Three of these files correspond to:
| Admintool | Git |
|---|---|
| original RPD | BASE.rpd |
| modified RPD | LOCAL.rpd |
| current RPD | REMOTE.rpd |
The custom script for the merge automatically copies these files that Git gives us and put in the folder "Temp-Merge" that we have configured.

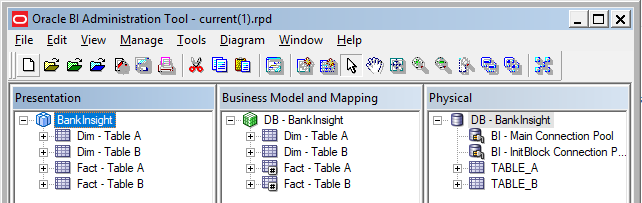
Then open the Admintool selecting the file "current.rpd" so that we only have to go to the option "File > Merge" and select the "original" and the "modified" RPD files:
- In the merge window, clic "Select > Repository" for the original master repository.
- Select the "original.rpd" file and put the "Repository Password" for the original RPD.
- Clic "Select > Repository" for the modified repository.
- Select the "modified.rpd" file and put the "Repository Password" for the modified RPD.
- Check the option "Equalize During Merge".
- Clic "Next".
- The "current(1).rpd" is created with the merged changes.
The script that open the Admintool to do the merge process is still waiting until Admintool closes and finish executing the commands in the script:
The final process of the script copy the "current(1).rpd" file to "BankInsight.rpd" in the git repository path and clean the temp merge path. At the end of the script Git will ask you "Was the merge successful [y/n]?". Before confirming the answer, from SourceTree, open the RPD and check that the changes have been applied.
Then clic "Commit" in the toolbar, change the comment if you need and confirm with the "Commit" button.
Due to the previous conflict Git does not delete the branch "Table B", but if you try to finish the feature again now Git already knows that the conflict has been resolved and merged, so simply delete the feature and return to the "develop" branch. This is the output from git finish feature:
In the case that two developers make a change that implies a conflict in the merge process of the Admintool, simply follow the process to resolve it from Admintool. But from the Git / SourceTree perspective the actions to be carried out are the same.
4.2.2.1 Using the automatic merge option#
When SourceTree detects a conflict and change the status to "merging" to resolve the conflict, if you want can use a more automatic option using the custom action "Resolve Merge (Auto)". The difference between the two options are:
- (No Auto) The script open the "current.rpd" only and let the user select the "original" and "modified" RPDs. Then manualy launch the merge process. In this case, if the merge process detect a conflict, it will show you in the decisions window. Here you can manually set for every conflict the modified or current version.
- (Auto) The script open the "current.rpd" and execute the merge process passing by parameter the name of the modified and original rpd files. When the merge command is used the decision step, in case of conflict, is set to default and the criteria with the property or object in conflict is:
modified = original ?then apply current versionmodified <> original ?then mantain modified version and reject current version